To store yellow data securely you can use an ecrypted disk file:
- When this sort of disk file is connected to a PC it will appear as a disk in Windows Explorer or in the Finder on a Mac.
- The disk file is encrypted and cannot be read without first entering a password. It is therefore important that you choose a password you can remember when you set up the disk file.
- The disk file should be saved in the OneDrive catalog on your computer, which will ensure that it will automatically be synchronized to your OneDrive account in the Office365 cloud, thus ensuring a backup is available should anything happen to your computer.
Requirements:
Any privately-owned personal computer which will be used to store or analyse yellow data must have a minimum level of security in place. This includes:
- Security tools such as antivirus software and firewalls, and automatic updates of these must be enabled.
- The computer must also have a screen saver which will automatically lock the device after no more than 15 minutes of inactivity, and which requires a password to wake the system up again.
Additionally OneDrive must be installed and activated. You can contact IT support for assistance with setting up OneDrive if you need help.
If you are unsure if you are able to meet the requirements for storing and analysing yellow data on your computer, you can contact IT-support@usn.no for help. Once the requirements are met you can begin preparing the disk file.
Preparing the disk file:
The process of preparing the disk file includes downloading the disk file, saving it in your OneDrive directory, and choosing a password.
Procedure for Windows:
The URLs below lead to two disk files. The first is 100 MB and the second 1 TB. The files are encrypted and can be downloaded and saved to your local OneDrive.
- If you do not need to store audio or video files, 100 MB should be large enough. Download a file of 100 MB/Small.
- If you need a lot of storage place, for instance to save audio or video files, choose the 1 TB file. Download a file of 1 TB/Large.
- Download the disk file and move it to your OneDrive directory (or save it directly to the directory).
- Right-click on the file and choose Mount.
- You should now have a new disk file (a new directory) in Windows Explorer.
Further procedure:
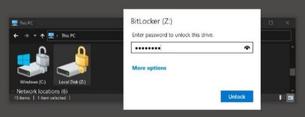
- Right-click the new disk file and choose «Unlock drive/Unlock station». Enter the temporary password: 12345678.
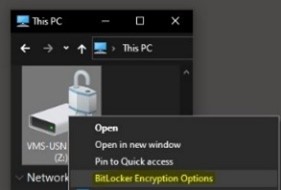
- It is important to change the password at this point. Right-click on the disk once and choose: BitLocker Encryption Options.
Note! In some versions of Windows10 this choice is not possible. In this case contact IT support for help in setting a password.
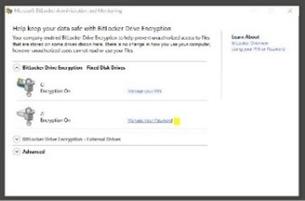
- Click on Manage your Password in the dialog box that pops up. Fill in your new password and confirm it, then click on Reset Password. You need to remember this password!
Note! Some of the text and options may vary in different versions of Windows10.
- The disk file (directory) is now ready and you can store your data there. Green and yellow data can be safely stored there.
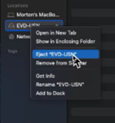
- When you are finished with the encrypted disk file it needs to be disconnected. You can do this in Windows Explorer by right-clicking on the disk and choosing Eject.
- The disk file will be unavailable. When you resume working on the disk you will need to find it in your OneDrive directory again. Right-click and choose Mount and enter your password.
The disk file will remain open while it is in use (mounted) and the OneDrive client will not be able to synchronize your data to the cloud. Synchronization will occur automatically when the computer is restarted, but to ensure that your disk file is synchronized and you have a backup you should take a break and backup your work manually before restarting.
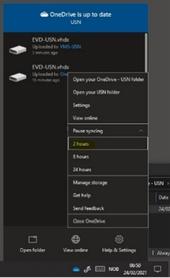
- You can make a manual backup by right-clicking the OneDrive icon in the «system tray» (bottom right on the screen) and choose Pause syncing for a period of time, for example 2 hours. (You don’t need to wait 2 hours before you continue).
- You can then right-click the OneDrive icon again and click in the yellow area to Resume synchronization.
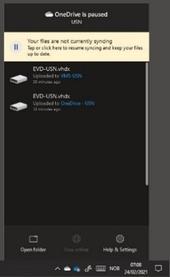
- When the synchronization is finished the status icon in the OneDrive directory will change from:
Sync pending: ![]() to Synced:
to Synced: ![]()
Procedure for Mac:
The file is a 1 TB disk file (SparseImage file) which is encrypted and prepared so that it can be downloaded and saved in your local OneDrive directory. Note! Download the MAC-EVD-USN file through the above link.
- Begin by copying and saving the file in your local OneDrive directory.
- Open a terminal window: Search for "terminal". Press Enter or click on "terminal".
- Next you will create a new password by running the following text in the terminal window: Hdiutil chpass OneDrive\ -\ USN/EVD-USN.sparseimage
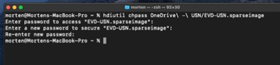
- Enter the temporary password: 12345678.
- Press Enter. You will then be asked to create and confirm a new password.
- Double-click the EVD-USN.sparseimage-filen in your OneDrive directory in Finder.
- Enter the password you just created and click on OK.
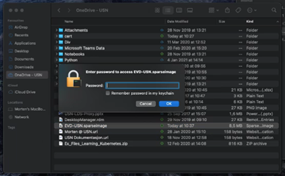
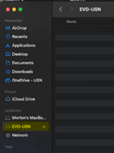
- You will now be able to see the disk in the Finder. And you can save files to the disk, and edit files that are stored there.
- IMPORTANT! You must remember to eject the image file when you are finished using it. This is to ensure that your work is backed up to the OneDrive cloud.
- Check that the file status is synchronized in OneDrive after you have disconnected the disk file.